
For August 2013, I figuratively dusted off those rusty strings to my multi-tracking recording and mixing rig to capture Deadstein’s weekly jams in a high quality format. During these sessions, Deadstein didn’t really play too much differently than normal, but a lot more attention was paid to capturing and presenting our music though the recordings. I think the results are remarkably different, for the better, in comparison to the room recordings we have been doing for the past several years. In the posting below, insight to the equipment, software and techniques used to produce these jams is presented for your edification.
Preparation at Home
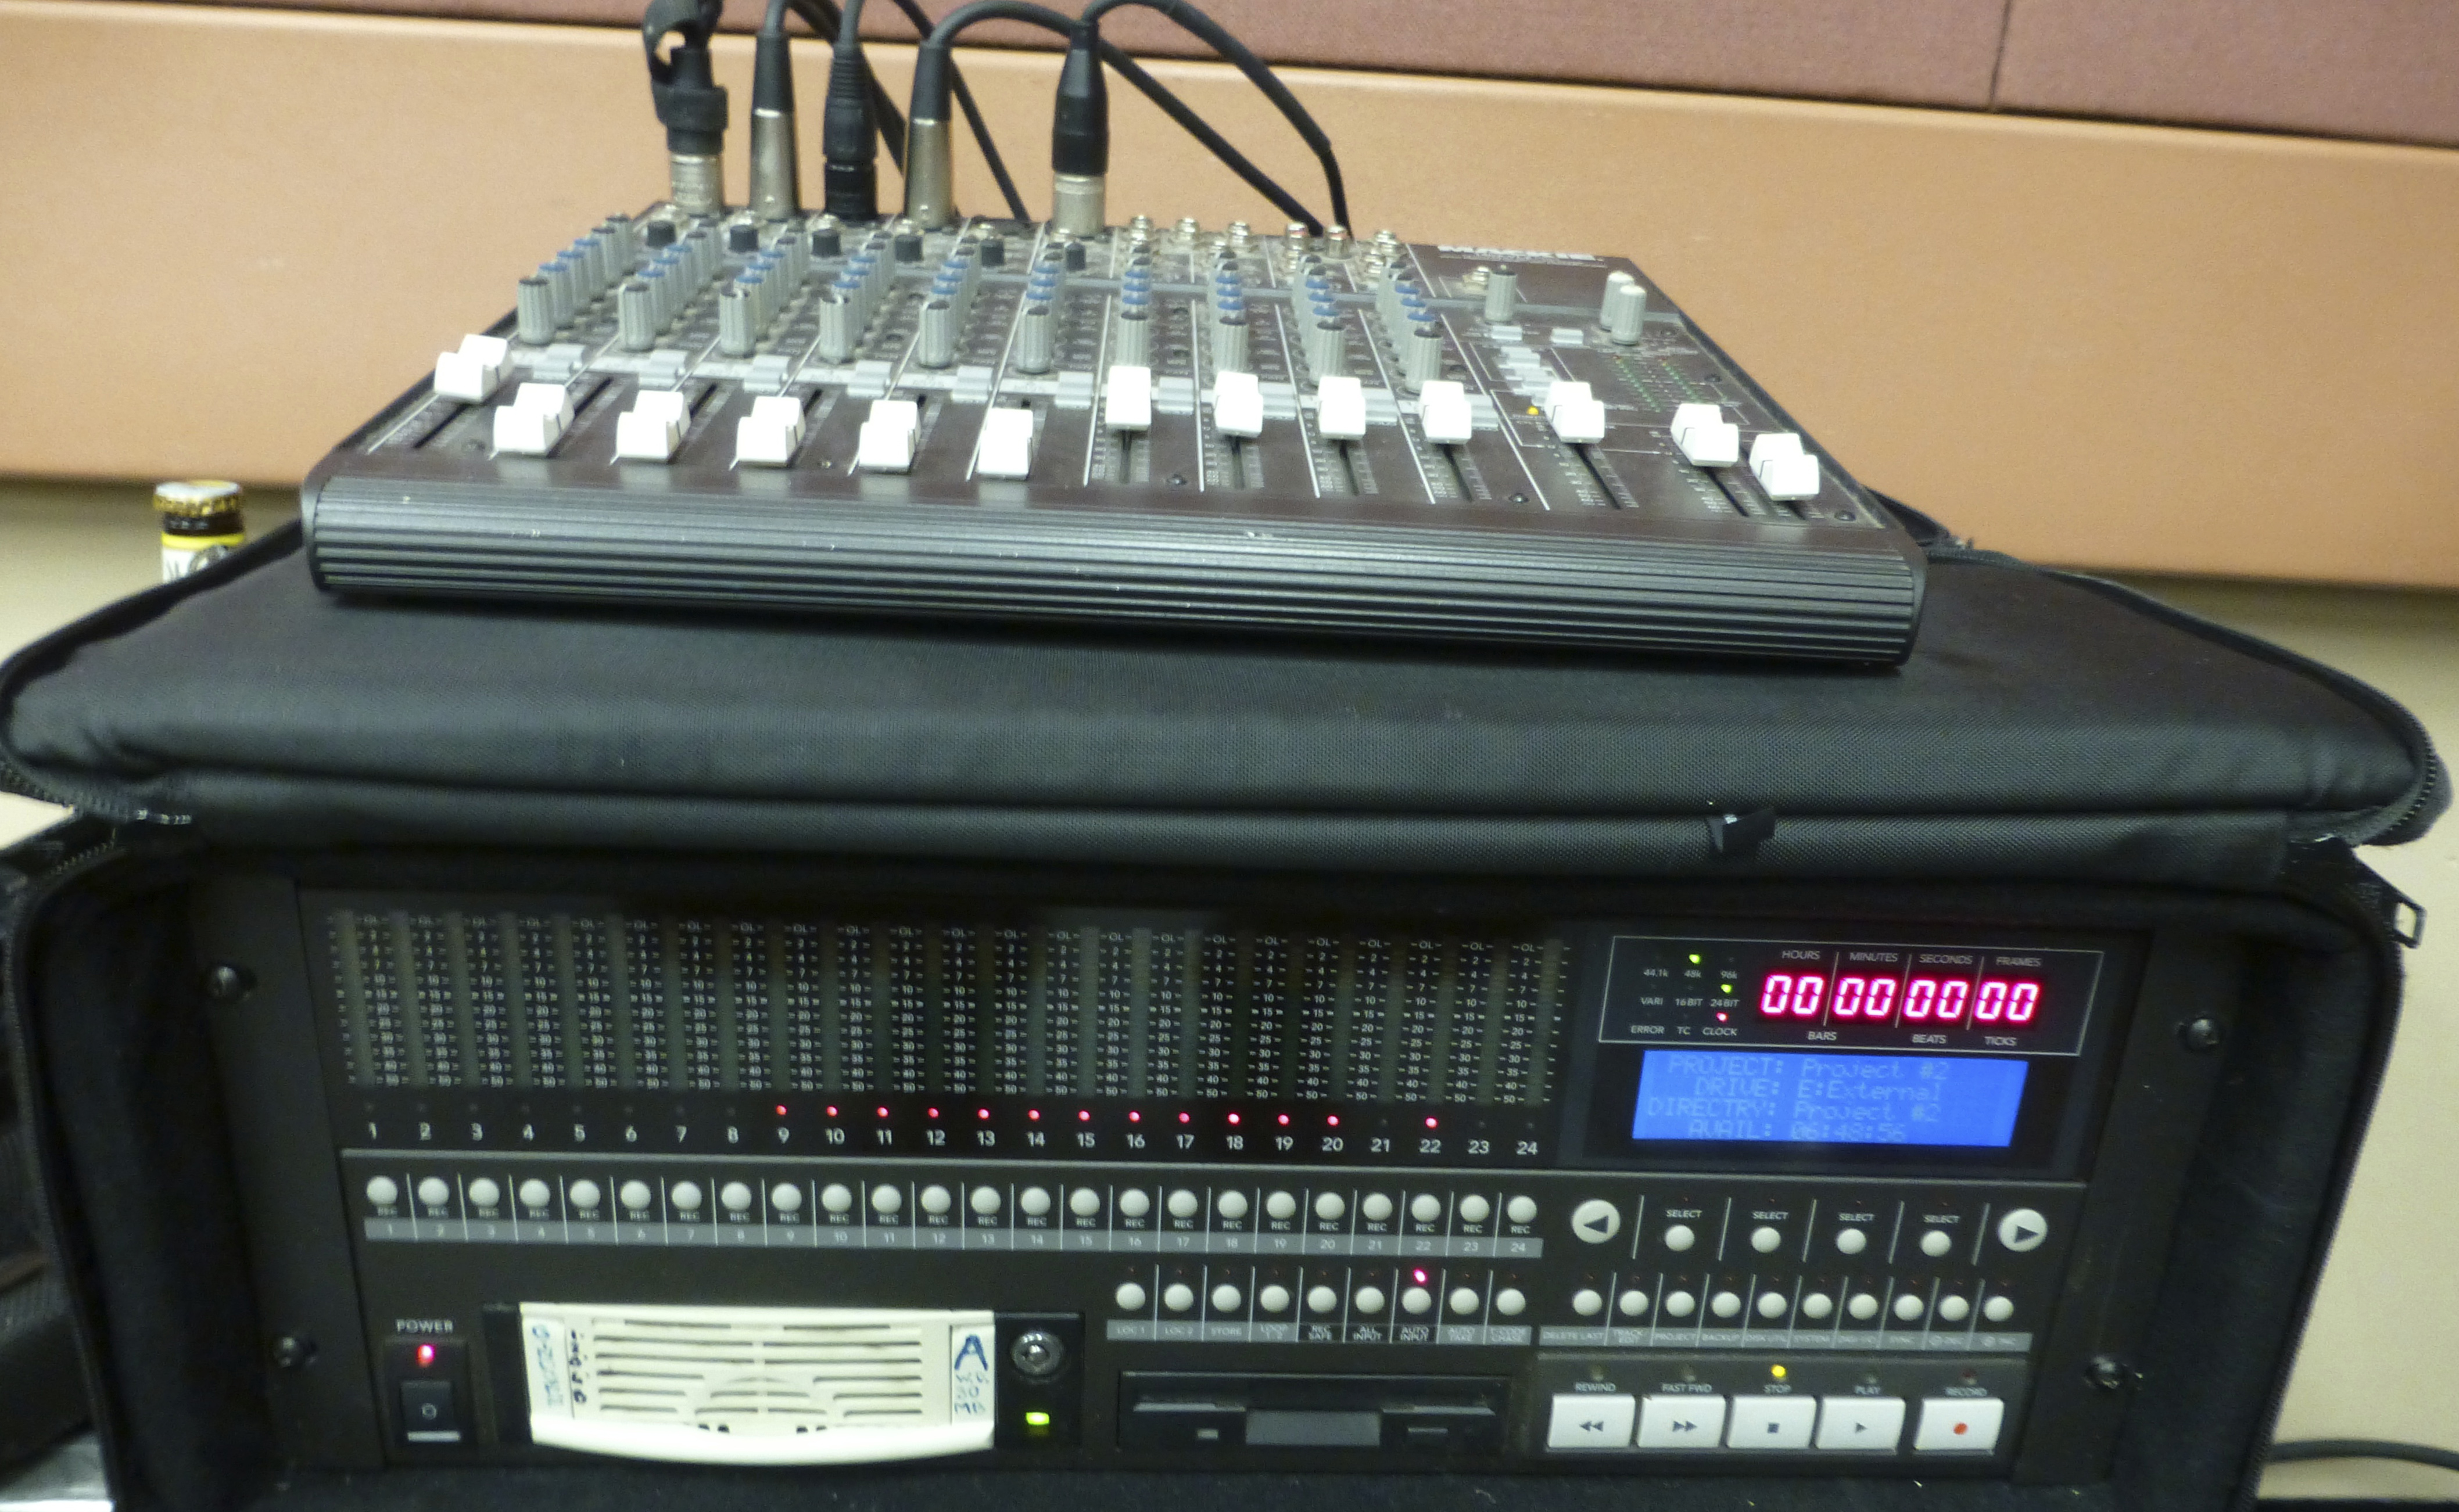
The first part of the whole experience is preparation for the jam session at home. I’ve done this many times over the years so I don’t need to write down a plan, but I do go over in my mind; who is scheduled to jam and how and I going to capture that person. My Mackie MDR 24/96 24-track mutli-track hard disk recorder records a maximum of 24 tracks with out real issue in groups of 8 inputs. If the unit boots, it should work incredibly simply and reliably. What I need to do at home is pack up and bring the microphone cables, microphones, micro clips and some pre-amps to compliment the equipment I can count of Carroll’s having in the studio. With 2 drummers, 5 singers, 2 guitars, a piano and a bass I been using 15 tracks.
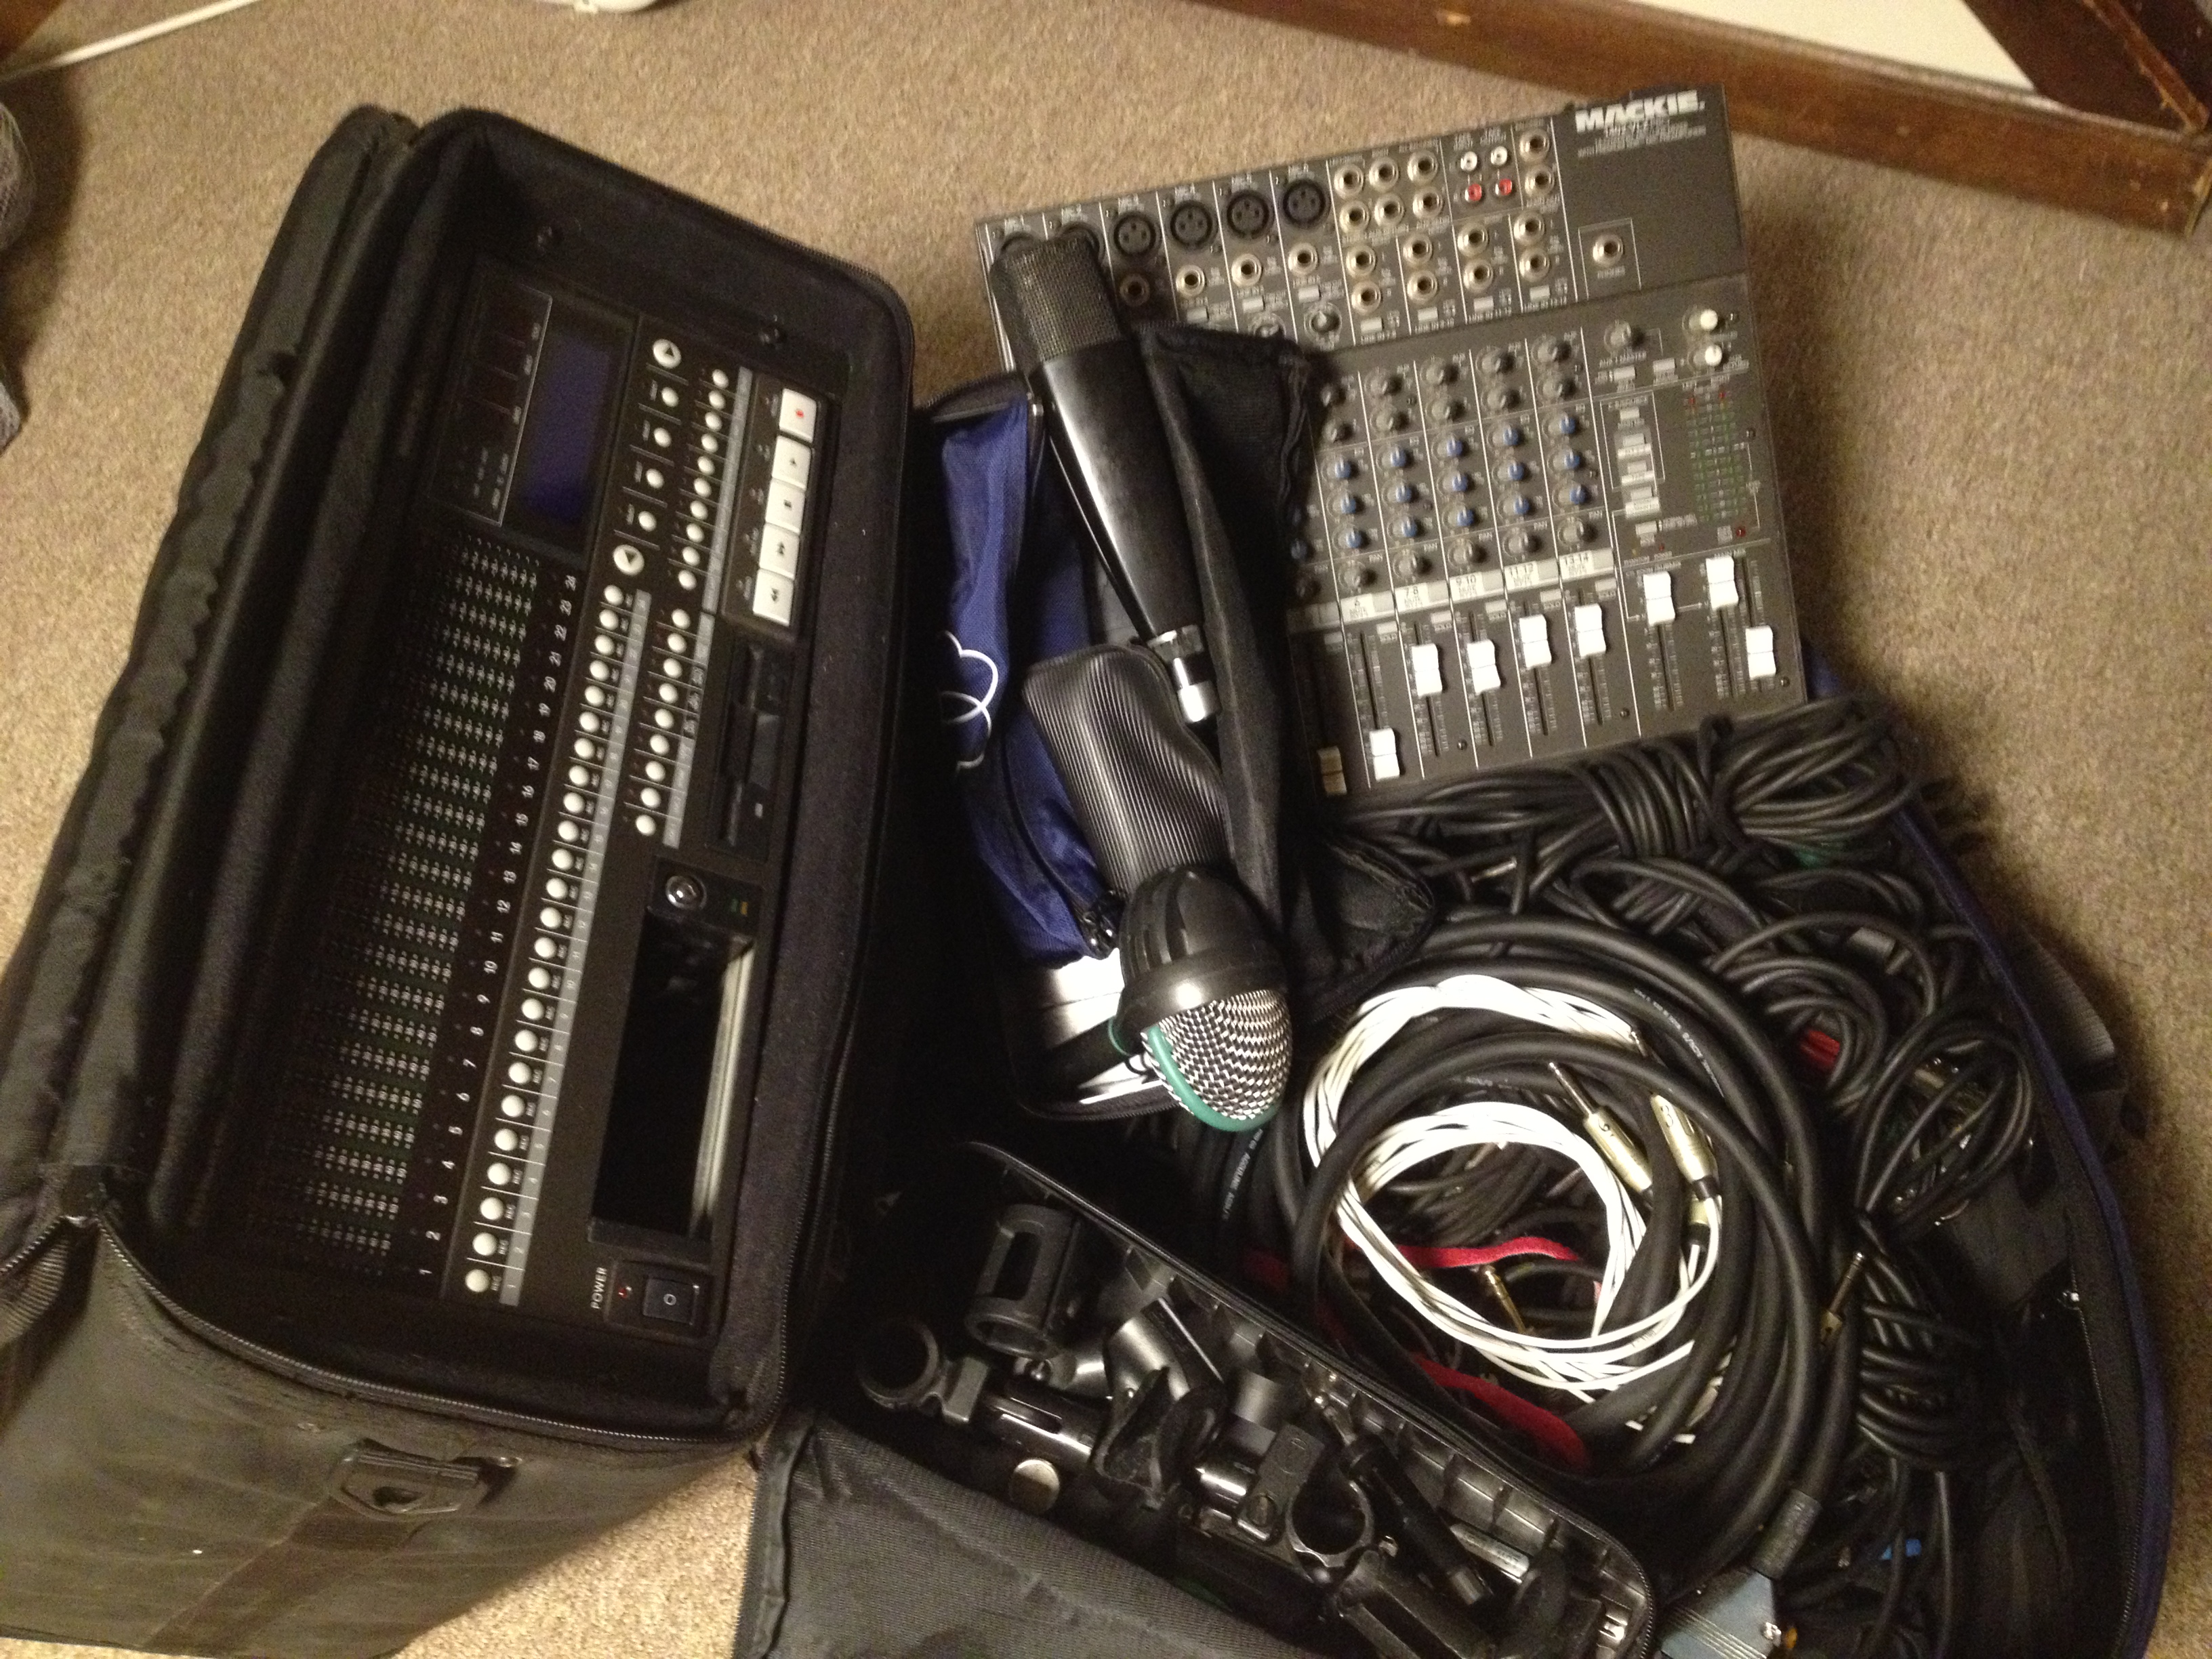
My taping equipment fits into two giant and very heavy cases.
Some how I have to pack all this stuff including cables, guitar equipment, microphones, accessories, into my suitcase on wheels. My recorder goes into a 4 unit rack-mount suitcase that I have to carry, I don’t trust rolling it on the sidewalk. My guitar is in my gig bag on my back with my song book, iPad and a couple of beers, if I’m lucky. The half-block walk with the three heavy bags from my parking spot on 54th or 55th street feels like climbing Mount Everest, but some how I prevail each week.
Setting Up the Studio
When I arrive at Carroll’s I’m usually exhausted from the at home prep, to the drive to the city and the arduous walk from the car. I usually arrive at the studio facing Kevin sleeping on the floor but he usually gets up to help me get set up. There is little time to waste if I want to get done within about and hour to get us off by our 8 o;clock start time. I have to unpack everything, assess the situation and implement my plan. This involves plugging in one of my 8-track snakes to the direct outs of the mixing board provided by Carroll’s to amplify the band’s sounds in the room. Anything beyond the 8 direct out provided by this mixing board, I am responsible to provide the pre-amps, so I have been using my Mackie 1402 VLZ-Pro small format desktop mixing board. I plug the insert outs into the reaming tracks in the recorder. Unfortunately, the small Mackie board only has 5 of its 6 channels working, so for the past several weeks, I have relied on all of the 13 tracks available to me to capture Deadstein. When I need 15 tracks or more , I will try to use some of the sub-outs provided on Carroll’s board and in theory, it should work fine.
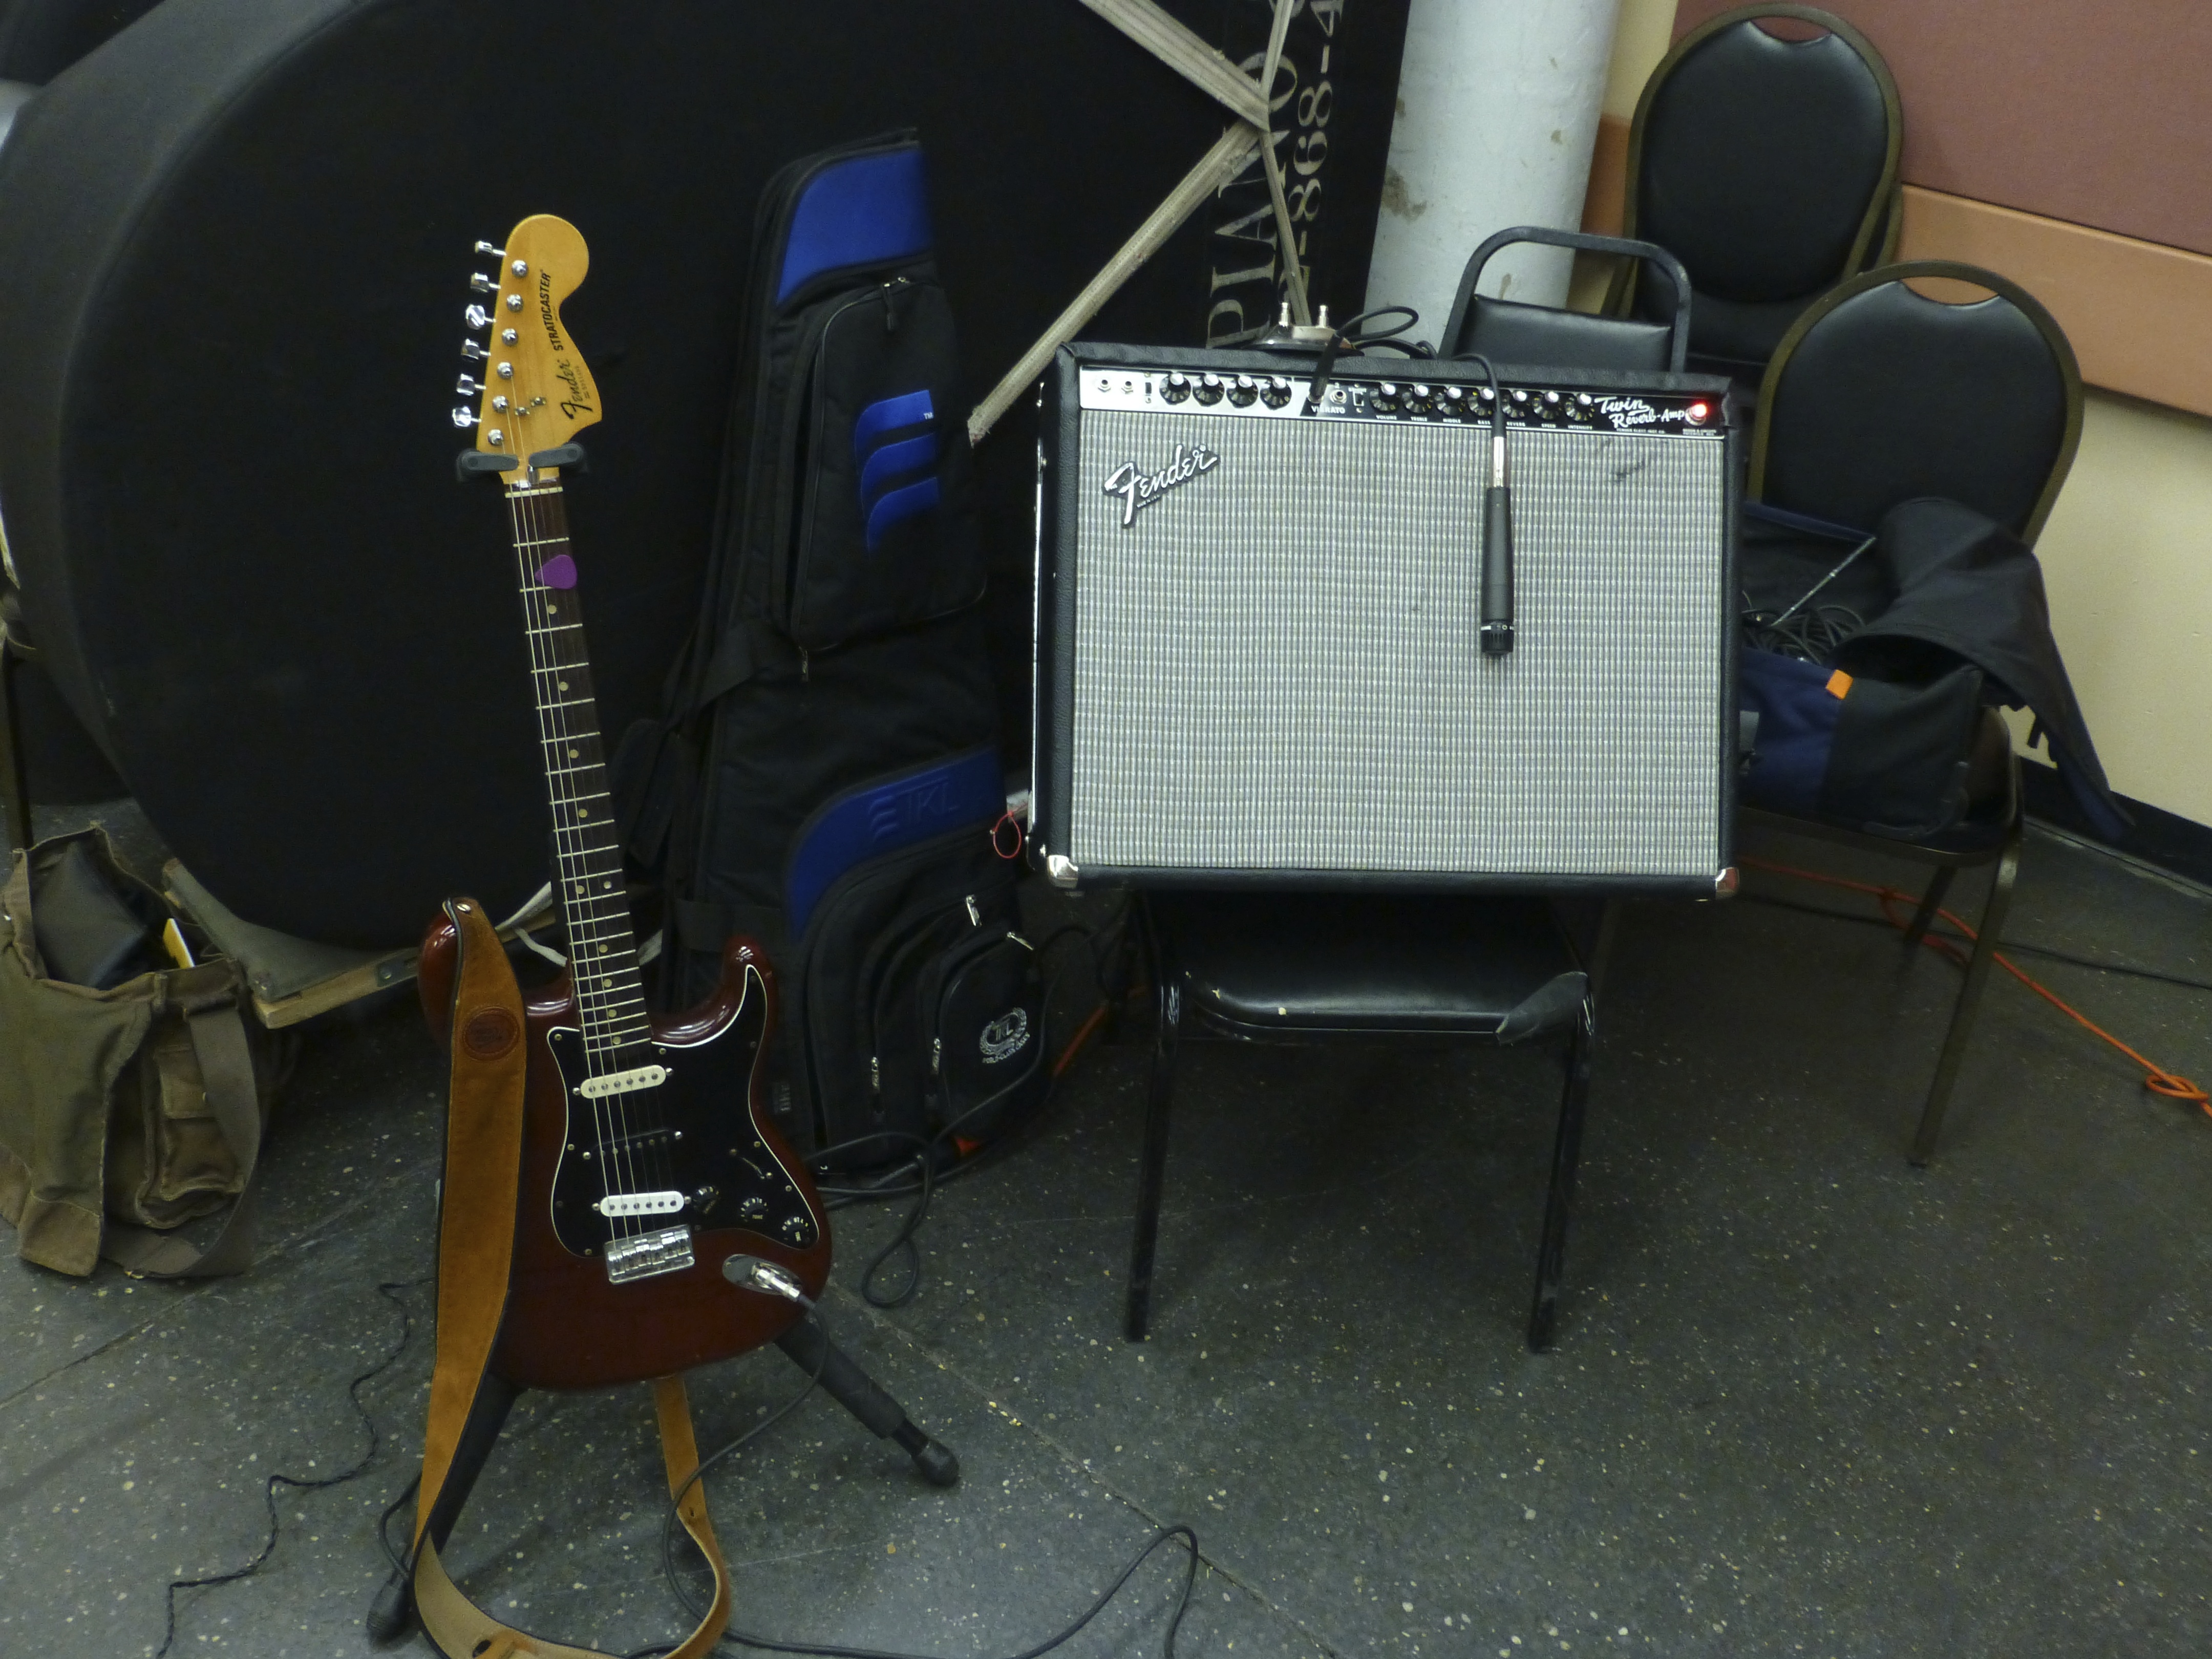
For each of these pre-amps I need a microphone. The only exception is with Kevin’s sound which I have been capturing utilizing the direct box provided by Carroll’s. I’m gonna have to buy one of those at some point because it’s been working well. I typically have been using Shure SM-57s dangling by a cable in classic off axis guitar amp position in front of each Fender Twin Reverb. I take the sound from Rich’s piano PZM mic from the sound board where it is plugged in. I have a Kick, snare and overhead on each drummer. Singers I pick up from their pre-amp in the board. I can usually get set-up, adjust levels and am ready within 30 minutes if I don’t encounter any serious problems along the way. The more I do the fewer problems I have as I zero in on a technique. Once I am set, I have levels, I hit record for the one time during the night and don’t have to worry about the recording process until the night is over. That’s when I do the setup in reverse and get packed up in about 20 minutes and haul all that stuff back to my car and back to my house to prep all over again for the next jam.
From Recorder to Computer
One of the great features of my Mackie 24/96 recorder is the way it works with a hard drive caddy that is easily swapped from the Mackie recorder to a drive bay in my computer at home. While it does require a stop and start procedure on my computer, it is great how the Mackie hard drive is a hard drive on my computer after the computer reboots.
Please understand, the Mackie recorder is out dated. It can only accommodate 120 GB maximum hard drives, try finding those in 2013. Thank G-d I performed the bios upgrade that was offered for about 6 months when it was offered 15 years ago that enabled me to go from it’s original 30GB limitation. That is how old the hard drive recorder’s technology is, but the quality of the musical digital to audio converters is still great. As you record the Mackie generates 15 minute chunks of *.wav files per track. After 4 hours of 13 track recording I am faced with the bevy of *.wav files in 2 to three folders which now have to be imported into my digital audio workstation (DAW). I use a program called Reaper.
Reaper (Digital Audio Workstation)
I have been using Reaper (http://www.cockos.com/reaper/) for the past 15 years orr so I have been happy with it since converting from the world of Cubase. Reaper was developed by the guy who originally developed Winamp, way back in the day. After selling his interest in it, this apparent computer genius and musician wrote a program for his personal band for multi-track editing, mixing, etc. It is a digital audio workstation (DAW). It sold/sells for fractions of the cost of what was overly bloated and high cost DAW software of the time such as Cubase. I have been a convert from the early days and Reaper has been a pleasure to work with for the cost of $60 every 5 years or so. One of the great bargains in the computer/music world IMHO.
Back to Deadstein and Reaper and my work flow. Importing all of these files into Reaper is pretty quick and simple in 2013. Since reaper keeps the original *.wav files in their original location, importing is really just a file connection to track process, as files do not move. Reaper is non-destructive editing, so these files are never touched, just referenced. Upon input a small *.repeak file is created that tells Reaper how to quickly access the actual music data contained in the *.wav files. Additionally, the files are originally captured in a *.wav format that has the “Broadcast Wave” attribute enabling Reaper to align files based on time synchronization stamps applied to the files. This makes placing all the 15-minutes *.wav file segment together a figurative snap, yet a chore. I can usually get all the files from a 4-hours jam into Reaper and ready to mix in about 20 minutes. This is from computer reboot, to place the hard drive in, to starting Reaper, to getting all the files in their proper tracks and time aligned and saving a new project in Reaper. It takes concentration but it is pretty convenient and reliable. I’m sure in 2013 there are better ways to do all of this, for additional thousands, but this still does wonders.
Universal Audio UAD-2 Plugins
Much like, Reaper, I have been an early customer for the past 15 years of Universal Audio (http://www.uaudio.com/) and their UAD-2 plugins which are used by me within Reaper or any DAW of your liking. The UAD-2 plugins are class leading models of effects such as EQs, compressors, reverbs, and more which run on Universal Audio’s proprietary hardware DSP (digital sound processing) computer cards. The cards contain DSPs which enable the host computer to off load the responsibility of running these resource intensive effects to these specialized audio cards, The numbers and sizes of the cards you own limit how many effects you can run simultaneously. Over the years, my investment in the UAD-2 ecosystem has been large and they continue to lure me into upgrades, expansions in order to keep current with them. In the end, access to these plugins gives me great access to great tools which are realistic emulations of many classic harware effects used in actual recording studios. I currently have one PCI UAD-2 card which sits in a PCI slot in my computer with 4 DSP chips, this comfortably gives the ability to run almost at will anything I want to do with our Deadstein mixes.
The Pre-Mix Rendering
The only exception to having enough UAD-2 resources at hand relates to applying an initial multi-track tape emulation to each track. This requires about 50% of my available DSP resources so I choose to perform it by itself in a pre-mix step where I render this imparted tape emulation to the tracks while also turning the multiple 15-minute files into one file 4-hour per track. The Studer A800 multi-track tape machine emulator is part of UAD-2’s new additions of resource hogging models that kind of goes along with their transition from the UAD-1 to UAD-2 platform. With all this stated, the use of the Studer tape emulator is new to me so I am kind of excited about it. I apply it to all track from our our raw *.wav files to simulate me recording to a Studer tape machine as opposed to a sterile digital Mackie hard disk unit. It’s just a little thing, but all these little things make a polished difference in the end. I also take this opportunity when rendering to the Studer to adjust the levels of each track to make them nicely balanced for when I want to work with them during mixdown. I have the opportunity to let certain tracks hit the tape harder and get that nice analog-esque warmth when I want it. Once I have this tape set up, which only takes 10 minutes or so, I have to render all tracks which probably takes 6 to 7 hours for 15 tracks of 4 hours of music. I try to do this first pre-mix over night, but to date, I have always made mistakes and haven’t been able to do it all without error requiring wasting another 7-hour window of computer work. Nevertheless, I eventually get it all rendered and am read to do the fun work of mixing the music.
Setting Up to Mix
 Once I have a successful pre-mix rendering operation the fun and the work begin. I need to establish the tracks and groups I will work with during the mixing process. This initially includes grouping all three mics on each of the drummers to their own respective sub groups, Therefore, on Lee’s kit I have been using an AKG kick drum mic and a small AKG clip on snare mic and Scott’s Neuman KM-184 as an overhead and I group them together and pan them to the left about 70%. Scott’s setup is similar but he has his own Shure kick drum mic and either my Sennheiser 421 or Shure SM-57 on his snare. I group Scott’s 3 mics, together, pan them right 70% the same as Lee’s is panned left and finally. and then I subgroup the Lee drum subgroup and the Scott drum subgroup together into an overall “drum” subgroup group. It sounds more complicated than it is and it all is simple and works great. The other additional tracks I need to establish are tracks that will contain the effects I will want to apply in parallel series; these typically include reverbs, delays and choruses. Most other effects such as EQs and compressors are placed as inserts on each track.
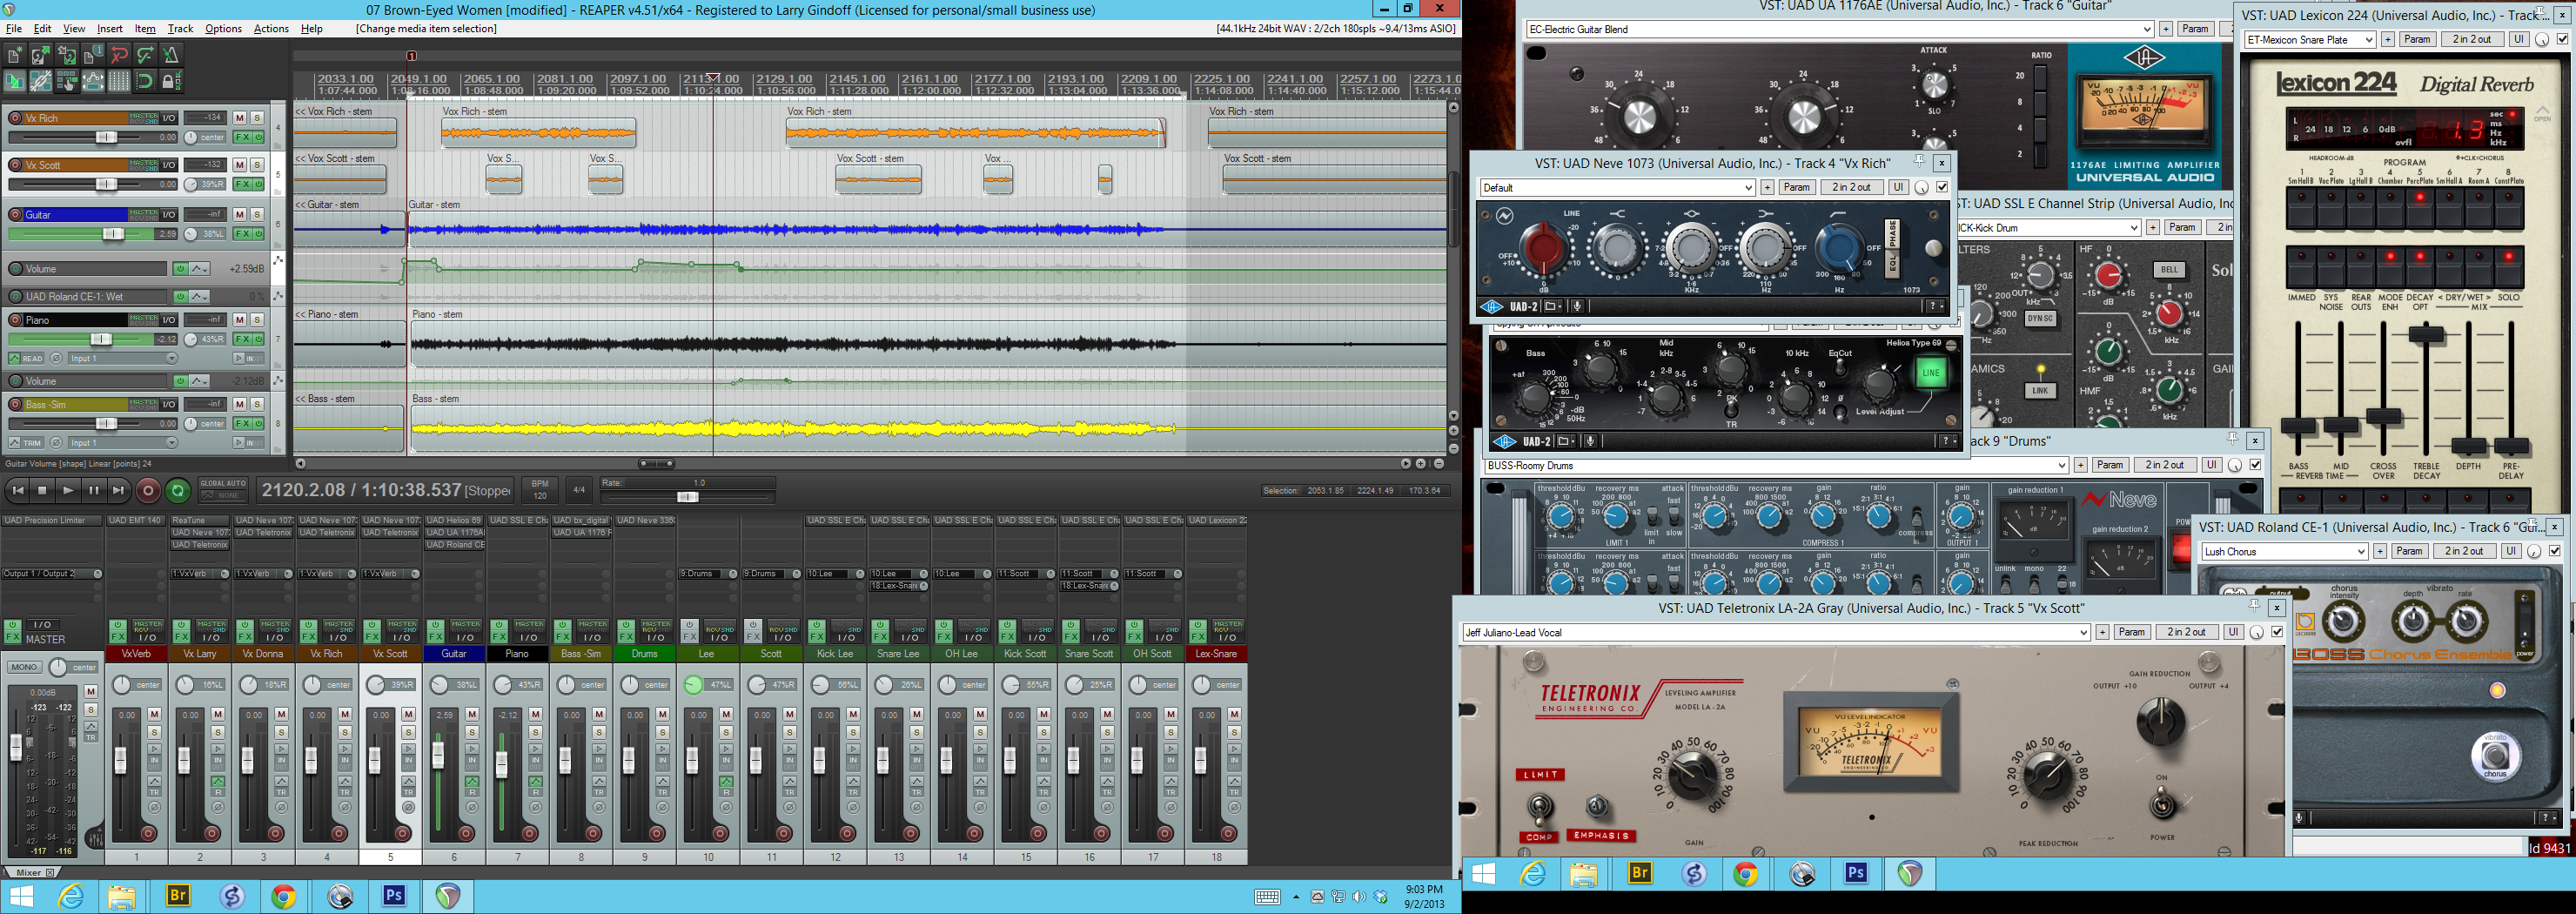
Print screen from my two monitor Reaper/UAD-2 work environment. Click on the image to view a closeup and explore the setup.
Adding Insert Effects
As I am doing all this setup as described above, I am listening to the tracks, trying to absorb what I hear thinking about which effects I will applying to them for the mix. While I have a pretty standard work flow and technique, my effect choices are predicated on past experience, ease of use, DSP resource use and my desire to experiment with new effects or new techniques that correspond to my own personal evolution in the world of music production.

SSL Series E channel strip versus the Neve 88Rs channel strip
Let’s explore what I was using. On the drums I use the same models mixing board channel strips on each drum track. channel strips include EQs and compressors and gates. For years, my go to channel strip has been the Neve 88RS. I am comfortable with it’s use and sound and it uses few resources. Starting with the August 28, 2013 jam, I switched the drum channel strip to a similar featured, but cleaner sounding SSL (Solid State Logic) Series E channel strip. While I am not as familiar with it, I liked its sound on this August 28 jam, so I’m gonna stick with it for a while and learn its ins and outs. Using these channel strips on drums I have typically started with one of the presets for the specific application, e.g. snare drum, kick or overhead and adjust a few of the setting accordingly most likely including compression threshold, and bass and treble levels and frequencies. Likewise I tend to apply the same technique to Rich’s piano which is recorded using a PZM microphone duct-taped to the underside of the piano lid.

Choruses and delays
For the electric guitars, which get recorded from the venerable Shure SM75s, I tend to use separate EQs and compressor. I tend to experiment with the variety of EQs and compressors I have at my disposal here, seeing if I can create a nice combination. Sometimes I will apply a chorus effect, a delay or other wacky effects on the guitars at very low wet-to-dry ratios as I feel is appropriate.
 On Kevin’s bass, I am currently capturing him through a direct box, so there is no impact of his amplifiers or speakers on the recording and it is up to me to create a good sound from this raw direct bass signal. The signal comes through cleanly and is a pleasure to work on. I have been using a combination of an bass amp, speaker cabinet, microphone modeler to begin with which I try to setup to replicate Kevin’s stack of amps. So far it has worked well, but I have been using this effect as a demo and don’t own it and my demo is expired. Whether or not I purchase this bass amp model effect I have been using will wait to be seen. You may be able to take care of the bass using the combination of EQ and compression to achieve the sound you are looking for without the amp modeler.
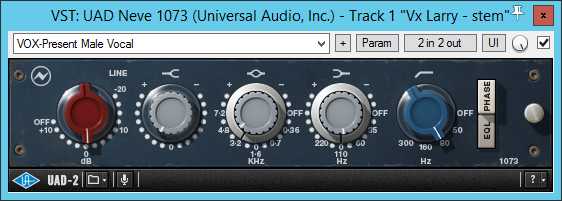
What is left are the vocals. Much like the guitars, I typically apply EQs (neve 1073s) and LA-2 compressors to the vocals. I tend to add crispness to the EQ but it takes a listen. I try to set the compression threshold levels per song that I mix in an attempt to get good levels throughout the songs. Whether the track is playing lead vocals or background vocals makes a big difference in the level settings, For the most part on vocals and most tracks, I try to stay away from getting to involved in adjusting levels and settings through automation and I prefer to try to use my compressors to achieve the levels I am looking for. With this said, I do go through all the vocal tracks and cut out/remove the signal from the vocal mikes when someone is not singing into it. This really keeps the mixes clean.

The Parallel Effects
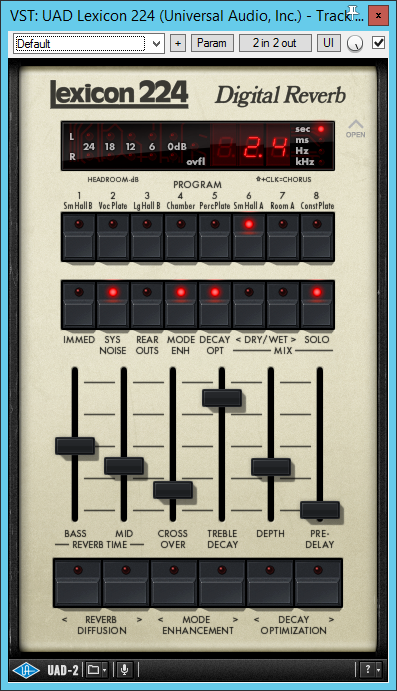 Other effects I use are the modulating, delay ones, including reverbs, which I tend to place in their own tracks to which I send slight amounts of certain tracks in series to these effects. For instance, I typically will establish one vocal reverb, the emulation of an EMT 140 plate reverb is my go to reverb. For drums, I will place some snare, sometime a little kick, through a drum reverb. I never send the the overheads through the reverb as I feel they act almost like reverb by themselves to the snare. A drum room simulation had been my typical work flow for drum reverb over the years, but my recent acquisition of Lexicon 224 digital reverb brings me to looking to use that more and more as I become more comfortable in its use. I think it is a classic for 80s music. I will also send tracks like vocals and guitars to a variety of delays and reverbs that I may establish as parallel effect tracks that introduce all sorts of spatial dimension to the sound.

Finally, We Mix the Music
After getting all the tracks setup and all the effect put in the places and all the sends sending at proper levels it is finally time to mix each individual songs. I will typically save this initial four-hour recording session with everything setup as a backup template and then save the opening song as the first Reaper file for each song. I set the beginning and end pints to the jam. I clean up the opening and closing of the song and then I mix the songs by making any special changes such as specialized effects or special cuts and/or pastes to fix any real terrible yet fixable errors. Finally, after listening to it over and over again, I render the mix to a 2-track 24-bit mix-down *.wav file. No one hears these 24-bit *.wav files because I then use a mastering process on all the 24-bit mix-downs.
Mastering the Mixes
Although Ideally you like to have someone else master your mixes, using their own equipment, speakers, room and ears, this is not available to me. I therefore do my best to perform a mastering application to the mix-downs. This accomplishes a few things. It is a final opportunity to adjust the sound of the mix-down that wasn’t accomplished during the mix. Sometimes, you just have a different mindset when listening and working on 2-track files versus then multi-track files. The mastering seems to apply a subtle final coating of similar effects on a variety of songs that establishes the feeling that they are all from the same session. The mastering process provides the time to maximize the volume of the song to take advantage of all the headroom that is available to it. It brings it up to standardized maximum volume. This is accomplished through compression, gain control and limiting. Lastly, the mastering process is where I render the 2-track 24-bit *.wav file into *.MP3 files which I can upload to the web for all to enjoy.
The first effect in my mastering chain is once again a reel-to-reel tape emulation used for mastering in the non-virtual world. It is an emulation of an Ampex ATR-102 2-track tape deck. I’ve been using 1″ 456 tape at spinning at 15 inches per second. Since I am not paying for reel/real tape I could run it at 2″ per second without financial concern, but I found that a bit too bright. On a similar thought, I eliminate all the modeled hiss and wow and flutter. I really like the flavor this emulation imparts. Next in my mastering chain is the use of a powerful mastering equalizer called the Manley massive Passive Stereo EQ. This thing just has such a large sweet spot and it is tough to ruin your music with it. From the EQ I add a Fairchild 670 old school compressor that was used in its day to master for vinyl. I used the Fairchild during these sessions in August 2013 but I have typically used a Neve 33069 in this position. So nice to have an arsenal of classic hardware.
That is the beauty of the UAD-2 effect ecosystem. The individual effects are expensive, the computer DSP cards are expensive but the use of the DSP as a processing card, as well as an anti-piracy dongle, enables Universal Audio to develop world class effects. They have a business model that supports system development and standardization over the years. Getting my effects engine loaded into a computer and getting the whole thing to work just happens without issue. Additionally, their provision of upgrades and special pricing keeps you moving forward with the company and their new developments. It’s expensive, addicting in their sales approach but I never feel as if I am ripped off. This is also one of the great experiences in the computer software/hardware world I have enjoyed and things just keep getting better and better with Universal Audio.
The final stage in the mastering is the application of a limiter which catches any final loud areas that would go over the zero level maximum. The limiter stops and limits, like a brick wall, any signal from going over the allotted maximum. This helps achieve maximum volume to the song. With all the mastering effects dialed in and in place each 2-track 24-bit mix-down is rendered into a MP3 file.
Finishing Up the Process
As one can tell, recording and mixing Deadstein is a lot of work and my labor of love. It is the initial reason I got into acquiring these multi-track recorders and all the infrastructure needed to mix multi-track recordings. After I finally have an MP3 to present to the band and rest of the world I still have to tag the MP3s with their metadata and finally, upload them to the Deadstein.com website using my FTP software. From there the website I designed automatically presents the songs to the world to listen to in the form of a hyper-linked MP3 files. Enjoy the music. Links to the recording sessions from August 2013 are provide below.
